STM32 Development and Debug with VSCode on Ubuntu 24.04

So my computer was recently updated to Ubuntu 24.04 as the main OS. At the same time, I wanted to finalise my transition to using VSCode instead of CubeIDE as my development environment. This turned out to be quite the hassle with no "one stop" information source on the internet that I could find, especially with my chosen MCU. This is what I did to finally get it up and running. I hope this will help someone in the future. Strap in, it will be quite the ride.
Table of Contents
Why so complicated?
This question have two interpretations. The first one is why make it this complicated in the first place? STM32CubeIDE is there and just works (tm)
The simple answer to this is that I prefer it. I find VScode faster, prettier and I can use one IDE for all my software work. On top of this, I have no choice for the moment as STM32CubeIDE does not support Ubuntu 24.04 and will fail on install
Why was this so complicated? Should this not be very straightforward?
Well it turns out that no, it is not that easy. I had two main problems that made it this complicated
- The ST provided toolchain does currently (as of september 2024) not support Ubuntu 24.04. It supports 20.04 and 22.04 only. Parts of the toolchain worked on 23.10, but that OS release is now EoL and I need to run 24.04 on my main computer. ST is not the fastest company to support newer OS releases on Linux, so it might be a while until this is fixed
- The MCU I have chosen is quite new, so support in FOSS tools is not great
In the future
At some point ST is going to get their stuff together and support Ubuntu 24.04. Once that is done it might be faster to use the STM32 VSCode Extention plugin in VScode and the STM32CubeCTL toolchain that this plugin leverage. That way, you will be running ST's toolchain for ease of setup but VScode as the IDE. I have not tried this yet, so who knows if it is going to be "better" or not. The method here is at least very fast once it works
Prerequisites
This guide require the following hardware
- A STM32C031 series MCU in some devboard. Using another MCU is probably trivial and in many cases easier
- A ST-link V2 debugger. I have the official one which can be purchased for around 20 Euro. Copies exist for cheaper but I dunno how those are compatibility wise.
- A computer that can run STM32CubeIDE. May or may not be needed depending on your specific MCU
The guide will also assume you have a STM32 project set up. There will at some point be a post how to do this.
Sources
What I did is based mainly on two guides + some searching on specific error messages. Please open the referenced links in separate tabs and keep them open. I will refer to them a lot moving forward.
The first one is from the ST32world's wiki. STM32 world is a community driven resource for the STM32 line of microcontrollers. The guide can be found here: STM32 wiki guide. It would probably have worked on an older version of Ubuntu and with a more common MCU, like the F103.
The second is a guide from the forum of Daisy, which is some kind of hardware platform for audio processing. I found a thread there for how to get one of their boards working in VScode and Ubuntu 24.04. This board luckily is based on a STM32 MCU. It was very, very helpful and got me most of the way there. The thread is here. Newkular, your excellent write-up was extremely helpful!
Install VSCode and extentions
Start by installing VSCode from Microsoft's website. Choose the "deb" download for Ubuntu. Use the downloaded file to install VSCode, either right clicking and using software centre or the terminal
sudo apt-get install ./<downloaded_installer>
Open VSCode and install the following extensions.
- C/C++
- Cmake Tools
- CMake
- Makefile Tools
- Cortex Debug
- Doxygen Documentation Generator
Install other tools
Installing the toolchain is mostly based on the STM32World wiki guide, with some modifications.
Build tools
Install tools needed to compile software
Libtool and build essential
sudo apt-get install libtool build-essential
Arm toolchain
Install the ARM toolchain. I found sources telling me I need to download them manually from ARM, compile and install it because it was removed from the Ubuntu repos. This seems to no be true. What makes it weird is that the name of the package sometimes changes ever so slightly and you won't find if you follow an old guide
sudo apt-get install gcc-arm-none-eabi
GNU Debugger
Simply install from the repos.
sudo apt-get install gdb-multiarch
OpenOCD
Following the STM32 wiki guide here turned out to be a mistake. Support for new MCUs in openOCD is apparently slow to roll out. Somewhere I found a quote that was "if the manufacturer supplies their own version of OpenOCD, for the love of GOD do not use anything else!" This is good advice. At this point I started to follow the guide from the Daisy forum, mostly at least. There is a statement there that using the openOCD version in the Ubuntu repo works but with weirdness. This is not true for my MCU, it flatly do not work at all. Follow the advice about using the manufacturers patched version! ST has their own openOCD repo here. Clone the repo into some temporary folder. Then install the libUSB dependency
sudo apt install libusb-1.0-0-dev
Once done you can run the command to compile openOCD as described in the Daisy forum post. I needed to run it with the --enable-stlink option for the config file, but that was probably due to missing the USB libraries before I installed. Anyway, it will not hurt to include
./bootstrap && ./configure --enable-stlink && make && sudo make install
Final fixes
OpenOCD relies on libtinfo5 libncurses5 in order to actually stop at breakpoints, at least as of september 2024. None of these libraries are in the repos for Ubuntu 24.04, only libncurses6 is. If you have trouble getting breakpoints to work, install these two libraries. They can be found here: libtinfo5 and libncurses5. Download the .deb file and install with
dpkg -i <deb-file-name>
You need to install libtinfo5 first as libncurses5 depends on it.
Then, fix the udev rules for the st-link debugger or you might have issues with being allowed to reach it. An archive with all files needed can be found in the Daisy guide here: udev-rules.zip. The files might also be possible to find from ST, but I did not bother to look. Unzip and copy the files. Instructions can also be found in the README file in the archive.
sudo cp *.rules /etc/udev/rules.d/ && sudo systemctl reload udev && sudo udevadm trigger
If you are using the older and/or more popular MCUs you can probably stop here and skip to how to configure VScode. The STM32c0x series of MCUs will require more work to get going
Fix for STM32c0x MCUs
Even the patched openOCD from ST is not 100% complete for usage. I found some open issue in ST's github repository saying "The repo version is older than release" which seems to be a reoccurring issue. The problem is that it is missing one (and maybe even 2) configuration files. The only way I found to get these is to use a new release of STM32CubeIDE to create them.
So first, boot into windows or a supported Ubuntu release and install STM32CubeIDE from ST's website. At the time of writing ST's site is a complete trainwreck. It was not possible to download as a logged in user on my desktop. The workaround seems to be to download as a guest (by providing an email) and use the emailed link. I managed to download using Firefox on my Android phone, but not 100% of the times.
Anyway; Start the IDE and open a new project using the same MCU as your device. Add some small dummy blink code, save and open the debug configuration. I would use this opportunity to verify that the hardware is OK by debugging once with default settings. Once it work, it is time to start getting the files you need generated.
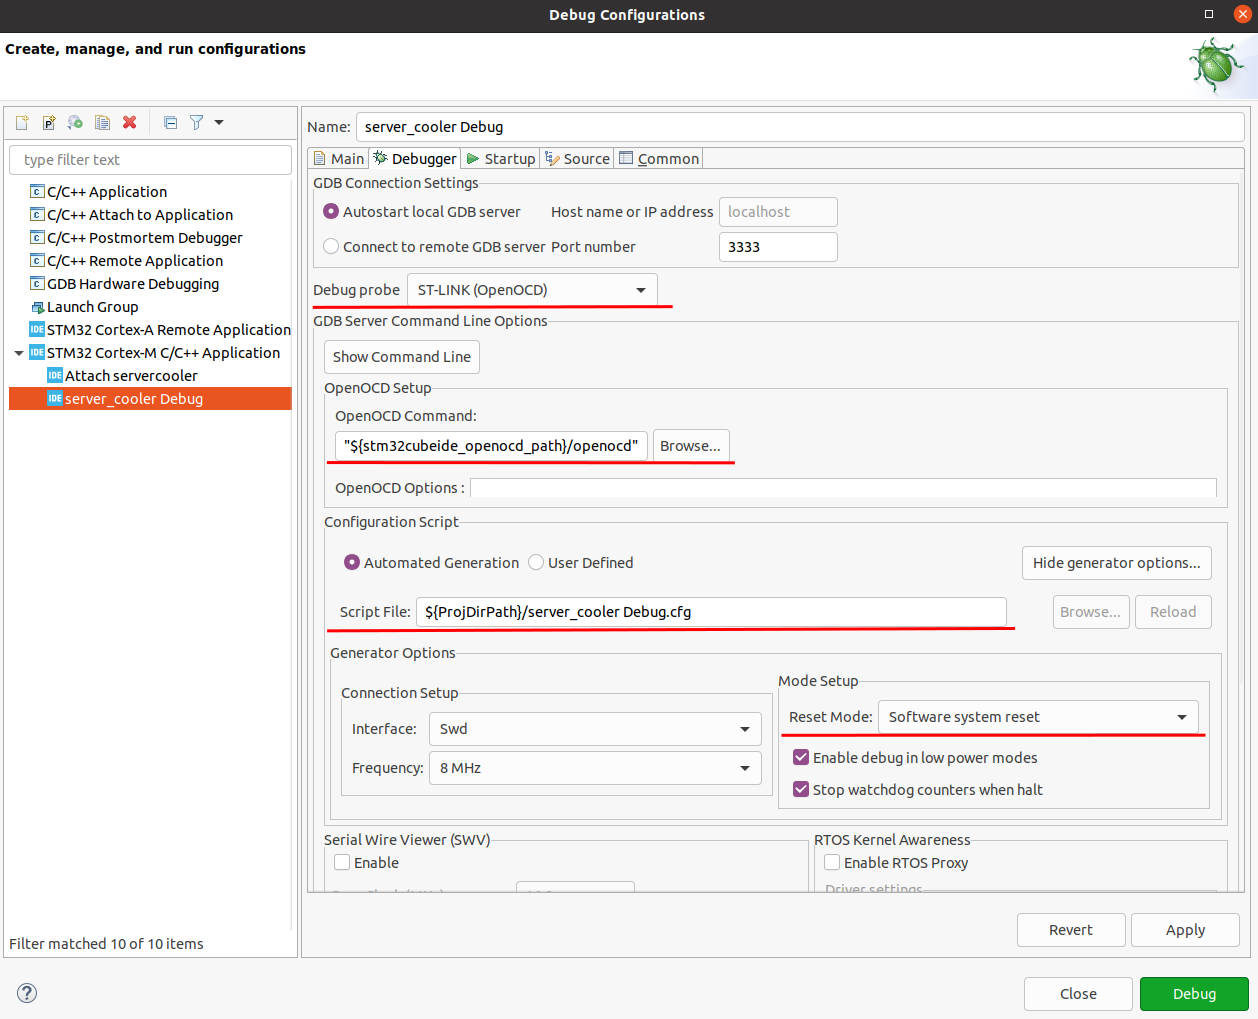
Open "debug config" by pressing the little arrow by the debug button at the top of the main window. The window shown above will appear. Choose "ST-Link (openOCD)" in the "debug probe" drop-down and enter your settings. If you do not have NRST broken out on the board it is a good idea to configure with software reset by pressing "show generator settings" and change the "reset mode" drop-down appropriately. Press apply and debug once more. If this works it is time to get the config files. There are three files you should get, and one optional I recommend getting
- The project debug config file. Named
<project name> Debug.cfg.It can be found in the workspace folder, or use the "script file" text-field to find the path to it. - The MCU config file. It is located in the plugins directory in STMCubeIDE. The location can be found if you press "browse" by the OpenOCD Command text box. Navigate to "plugins" and find any folder named "openOCD" in the folder name. There are more than one but only one is correct. The one you need have the path
resources/openocd/st_scripts/target, the other do not. Copy the file corresponding to your MCU from here. For me it was STM32c0x.cfg - The memory helper file. It can be found at the same location as the MCU config file, just one level higher. It is called mem_helper.tcl
- Optionally. The SVD file for your MCU. It contains register description and is very helpful to debug peripherals. It can be found in STM32CubeIDE or from ST's site under "CAD resources" on the MCU series homepage. STM32C0x SVD files. Downloading from ST is easier.
Transfer these files to your Ubuntu machine. Here they need to be copied to the correct place. The MCU config files is ideally copied to /usr/share/openocd/scripts/targetand the memory helper file to /usr/share/openocd/scripts. The SVD file and the project debug config file can be copied into a debug folder in your project folder. Rename the project debug file to something sensible without spaces, such as project-debug.cfg.
Confgure your project for debugging in VScode
Now, you need to set everything up in VScode. Open VScode and find/create the .vscode folder in the project folder. It need at minimum these files that may or may not already be created.
Launch.json
Launch.json is the config file for your debugger. My launch.json file is this one. Copy and replace paths as needed
{
// Use IntelliSense to learn about possible attributes.
// Hover to view descriptions of existing attributes.
// For more information, visit: https://go.microsoft.com/fwlink/?linkid=830387
"version": "0.2.0",
"configurations": [
{
"type": "cortex-debug",
"request": "launch",
"name": "Debug (OpenOCD)",
"servertype": "openocd",
"cwd": "${workspaceFolder}",
"runToEntryPoint": "main",
"executable": "${workspaceFolder}/build/<executable>.elf",
"device": "STM32C01K4T6",
"searchDir": [
"/usr/share/openocd/scripts/",
],
"configFiles": [
"${workspaceFolder}/debug/<project-name>-debug.cfg"
],
"svdFile": "${workspaceFolder}/debug/STM32C031.svd",
"showDevDebugOutput": "raw",
}
]
}
Most lines are self explanatory, but I need to highlight that the "searchDir" part is needed or else openOCD will search for all configuration files in the ${workspaceFolder}/debug directory and fail if it need to read some "global" config files.
Settings.json
This is the settings.json file I use. Replace paths with ones appropriate for your environment.
{
"files.associations": {
"*.c": "c",
"*.h": "c"
},
"C_Cpp.default.compilerPath": "arm-none-eabi-gcc",
"makefile.launchConfigurations": [
{
"cwd": "/home/<your-user>/repos/STM32/<project-name>/build",
"binaryPath": "${workspaceRoot}/build/<executable>.elf",
"binaryArgs": []
}
],
"cortex-debug.gdbPath": "gdb-multiarch",
"makefile.extensionOutputFolder": "./.vscode"
}
c_cpp Properties
Replace the "defines" with what is needed for your project. If you are unsure what name to use you can find it in the make file that cubeMX autogenerated. Look for what C_DEFS use as MCU name, alternatively what the startup_<device_name>.s file is called
{
"configurations": [
{
"name": "Linux",
"includePath": [
"${workspaceFolder}/**"
],
"defines": [
"stm32c031xx"
],
"cStandard": "c17",
"cppStandard": "gnu++17",
"intelliSenseMode": "linux-gcc-x64",
"configurationProvider": "ms-vscode.makefile-tools"
}
],
"version": 4
}
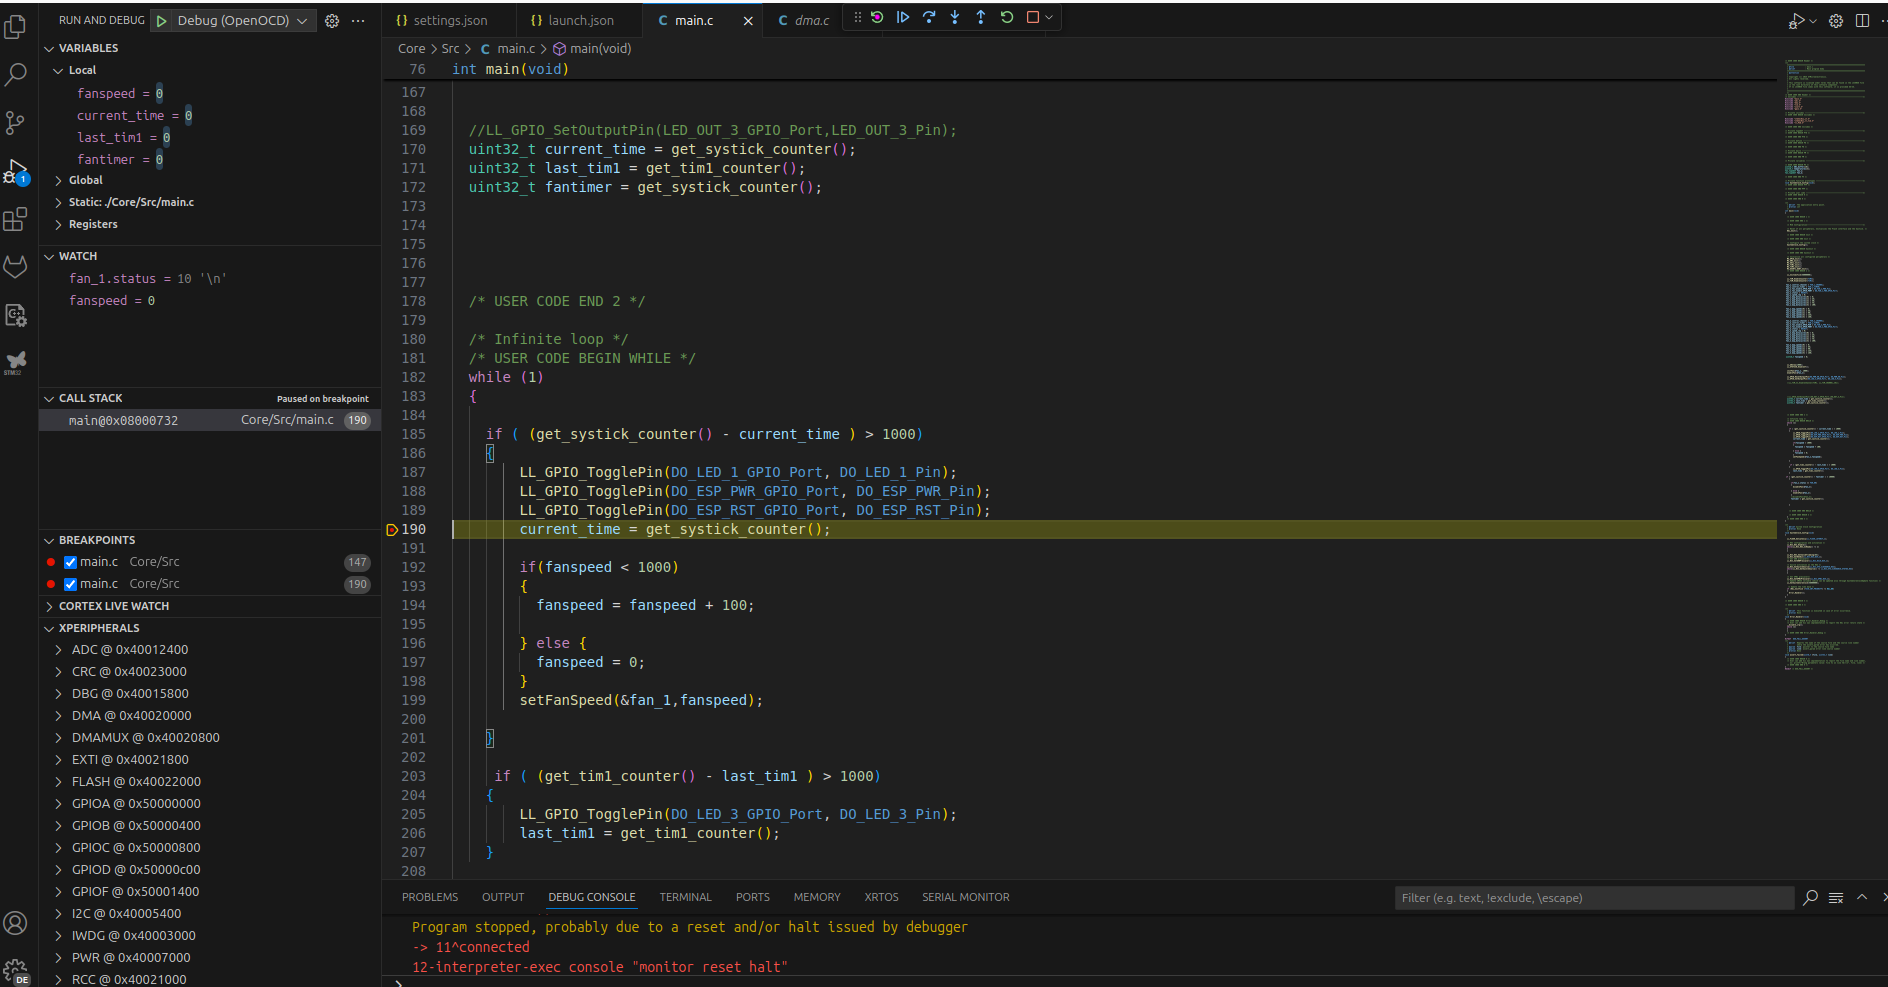
Test and starting debugging!
Now it should be possible to test everything. Write some quick blink code, compile the project by clicking "build current target" in the make tab. Then press F5 to debug. I am still a bit unsure exactly when the flashing is done as it is so insanely fast for my still very small codebase. But it is very fast/snappy to use. To start the debug session takes maybe 2-3 seconds and if only 1 or 2 small c files has been changed the compile time is around the same.